 Start by making a loop as shown in Figure 1. Insert the crochet hook through the loop, catch the yarn, and then draw it through the loop. Pull on both the yarn strands to draw up the loop (you want the loop close to the hook but not too tight). This is your starting loop.
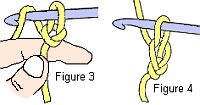 To make the actual chain stitch, draw the thread over the crochet hook (Figure 3) and then pull it through the loop (Figure 4). This is your first chain stitch. Now simply repeat the process until you create the proper length of chain (this will be what is referred to as your "foundation" row).
Note: One loop always stays on the crochet hook and is not counted as a stitch. Also, loops should be just loose enough for the crochet hook to go through easily.
Single Crochet (sc)
Once you’ve completed your chain (foundation) row, count back two chain stitches (not counting the loop on the hook) and insert the hook into the second chain (Figure 5).
Note: In a chain, always insert the crochet hook through the "v" and under another thread in back.
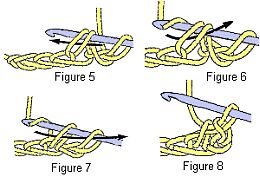 Place the yarn over the crochet hook and then draw the yarn back through the chain (Figure 6). You should now have two loops on your hook (Figure 7).
Place the thread over the crochet hook and draw it back through both of the loops.
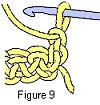
This completes one single crochet (Figure 9). Complete the row making one single crochet in each chain. Make certain you keep the chain flat and don't allow it to twist.
 Turning Chain (t-ch)
To keep your crochet piece straight (and prevent buckling or twisting), one or more "turning" chain stitches is added just before you start the next row of stiches.
To do this, wrap the yarn around the crochet hook, and then use the hook to draw the yarn back through the loop from the previous stitch. (Basically, you're adding one or more chain stitches before you turn and begin the next row.)
The number of turning chain stitches you make depends on the stitch that will begin the next row (the directions will most often tell you how many turning chains are needed). With the exception of a single crochet, the turning chain will always count as the first stitch.
After The First Row
 For the first row of any piece, you'll crochet into chain stitches. For additional rows, you'll be working with actual crochet stitches (single, double, etc.).
The first stitch of the new row is made in the last stitch of the previous row. Insert the crochet hook under the "v" as shown here.
Round (Foundation Ring)
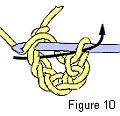 To work in the round, a foundation chain is joined into a ring. Crochet stitches are worked around and around without turning the piece to the other side.
After creating a chain, use a slip stitch to join the two ends (Figure 10). To do this, insert the crochet hook into the first chain and then draw yarn through both that first chain and the loop on the hook.
Double Crochet (DC)
 Wrap the crochet hook with yarn and then insert the hook through the ring from front to back. Next, hook the working yarn and draw it back through ring. At this point, there should be 3 loops on the crochet hook.
Wrap the hook with yarn and draw it through the first 2 loops on the hook. Now there are 2 loops on the hook. Wrap the hook with yarn again and draw it through both loops on the crochet hook. That gives you one completed double crochet.
Half Double Crochet
Starting with a chain, wrap yarn over the crochet hook and then insert it into the third chain from the hook. Draw the yarn through the chain (there should be three loops on the hook).
Wrap yarn over the hook and draw the yarn through all three loops at once. That completes one half double crochet.
Double Crochet Front Post
Yarn over and then insert hook from front to back and to front again around the vertical paty of next st, yarn over and draw yarn through, yarn over and complete dc.
Double Crochet Back Post
Yarn over, reaching over top of piece and working on opposite (right) side of work, insert hook from right to left around vertical post of next st, yarn over and draw yarn through, yarn over and complete dc.
 Joining New Yarn
Oftentimes, yarn needs to be attached to a work in progress. If possible, add new yarn at the end of a row as shown in Figure 15. If new yarn needs to be attached within a row, instructions are as follows:
Leaving a 4-inch end, draw up a loop in the stitch specified and then draw the end through the loop and pull tightly to fasten (see Finishing Stitch below). Draw up another loop in the same stitch and continue working the piece.
 Finishing Stitch
When the piece is finished, cut the yarn but leave a "tail" of at least a few inches. Draw it through the last loop and pull it tight. Using either a yarn needle or the crochet hook, weave (darn) the end of the yarn back through several stiches.
 Joining Seams and Edges
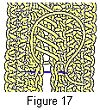
Place pieces side by side. Using matching yarn and a yarn needle, sew their edges together, inserting needle through both loops of the tops of the crochet stitches (Figure 17).
Abbreviations:
| ch | chain | pc st | popcorn stitch |
| sc | single crochet | bl | block |
| h dc | half double crochet | sp | space |
| dc | double crochet | rnd | round |
| tr | treble | incl | inclusive |
| d tr | double treble | inc | increase |
| tr tr | triple treble | dec | decrease |
| sl st | slip stitch | beg | beginning |
| fp | front post | bp | back post |
| * or ** - Repeat the instructions following the * or ** as many times as specified. | |||
| ( ) - Instead of * or **, you will sometimes see a phrase like (ch 2, skip 2 ch, dc in next ch) 4 times. This means that whatever is included in the paratheses should be repeated the number of times specified directly after the closing parenthesis. | |||
| Work Even - Continue working the pattern as before over the same number of stitches without increasing or decreasing. | |||


No comments:
Post a Comment